GitHub: Setting up a version control repository – Part 1

We have been tracking along nicely with the tutorials on using Git for version control. So far, the lessons have focused on version controlling documents on a local computer, but another groovy feature of Git is it allows you and your collaborators to version control documents using GitHub.
What is GitHub? GitHub is a web-based version control repository and is the single largest host for Git repositories. One way to think of it is you can use Git to version control project documents on a local computer, then push the version history of those documents to a repository on GitHub. A collaborator with access to that repository (or your future self!) could pull down the entire version history, request to make changes to the project, comment on issues, improve code, etc. That is, GitHub allows the project’s version history to be distributed between many collaborators.
Let’s focus on a few short steps to set up a project repository on GitHub. This tutorial will assume you have a basic understanding of Git and you have a GitHub account.
Let’s use Marty’s Python program to create a project folder called github_rocks. In a Terminal (Linux, Mac) or Git Bash (Windows), run the following line of code to create the project folder:
1 |
$ python project.py /home/joanna/Documents/ github_rocks
|
Of course, change the filepath so it works for your own computer. Windows users need to specify the filepath in the line of code eg. like so: python project.py '/c/Users/Joanna/Dropbox/' github_rocks. Also, “repository” and “folder” mean the same thing but I use “repository” to refer to the one on GitHub and “folder” to refer to the one on the local computer.
Cool. We want to version control the contents in the github_rocks folder, so navigate to it. Inside, there are 3 subfolders: data, doc, src. The src subfolder contains all the source code for the project (eg. LaTeX templates for protocols and manuscripts, code files to process and analyse data, etc.) so this needs to be version controlled, but data only need to be backed up (raw data should never be changed!) and we don’t need to version control documents if we can generate them with a program. So the data and doc folders don’t need to be version controlled.
In the github_rocks folder, you could add .gitignore and README.md files that contain information on files we want Git to ignore (eg. LaTeX log files, .Rhistory, Python cache files, etc.) and information describing the project. Next, initialise Git in the github_rocks folder, check which files Git sees using git status, stage and commit the files to be version controlled, and check Git’s log to see that the commit has been correctly performed:
1 2 3 4 5 |
$ git init
$ git status
$ git add -A
$ git commit -am "Initial commit"
$ git log
|
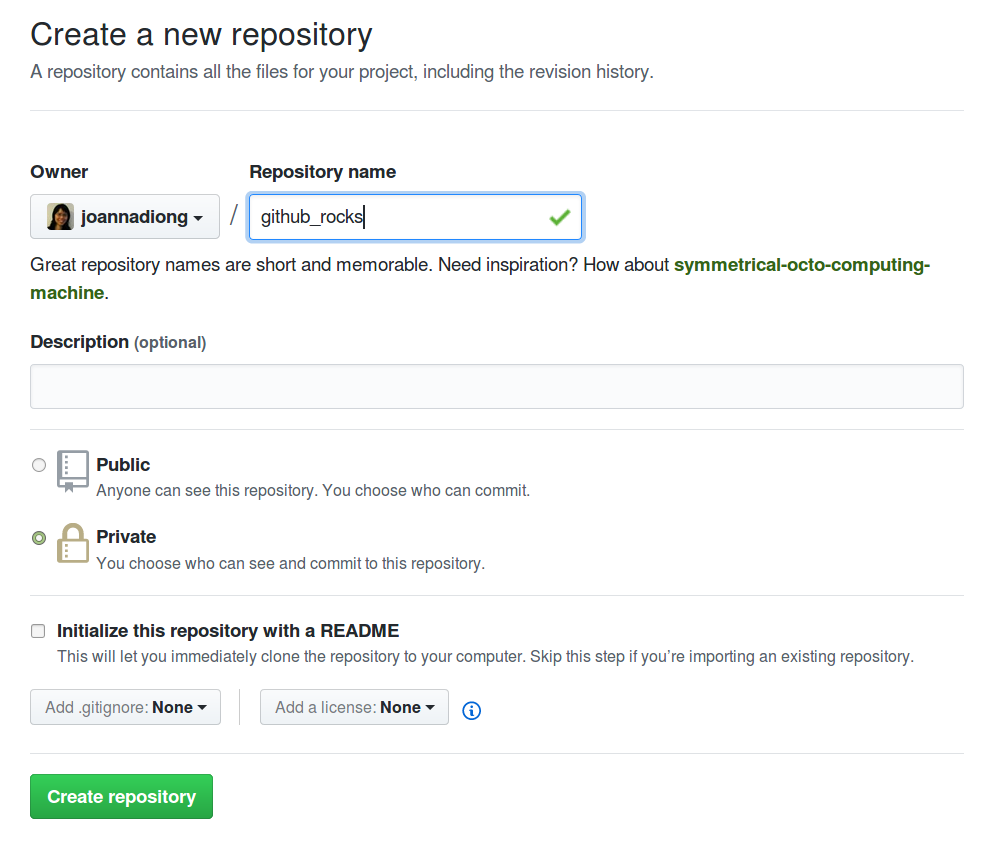
Next, in a web browser, go to your GitHub home page and click on “New repository”. The page will load to produce a figure something like Figure 1. Name the repository github_rocks, choose “Private” so only you can see the repository (the repository can be made Public in future), then click “Create repository”.
Figure 1:
We now have a folder github_rocks on a local computer and a repository github_rocks on the internet in GitHub: these repositories need to be linked. The helpful folk at GitHub provide optional commands to push an existing repository (on a local computer) to the repository in GitHub, using the command line. Run these lines in the Terminal or Git Bash and enter your GitHub username and password when prompted:
1 2 |
git remote add origin https://github.com/joannadiong/github_rocks.git
git push -u origin master
|
Git links your local folder to the GitHub repository and by default, names this repository origin. You can check that the link connected with origin is correct by typing:
1 |
$ git remote -v
|
And if you navigate to the GitHub repository in your web browser, you will see a list of the files Git is tracking and the README text online. Nice!
Summary
We created files for a project and initialised Git in the project folder to version control the source code. We staged and committed the source code files. We created a repository for the project on GitHub then linked this to the local project folder, so the version history of our project is now recorded on the web.
We will expand more on these points in the next post.
